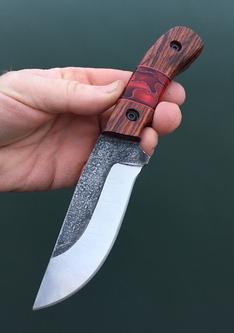
Knife scales are thin slabs of material that are affixed to the tang of a knife. They can be made of a variety of materials including stabilized wood, brass, micarta and alumilite.
These scales are then affixed to the tang of the knife with rivets or metal pins. The rivets or pins are driven into holes that are drilled through both scales and the tang of the knife.
Material
There are a variety of materials used to make knife scales. Some are natural such as wood and others are synthetic.
The most popular natural material is wood, and this is a common choice for many knifemakers because it offers classic looks, ease of work, and long-lasting performance when properly cared for.
Another popular natural material is bone and tooth. These materials are often dyed and stabilized to create a durable handle that is easy to shape and polish.
Carbon fiber is also a common option for knife handle scales. It is a lightweight, strong, and durable material that is incredibly resistant to heat and impact, making it an excellent replacement for traditional metal-based handles.
Cutting
Making scales is an easy and inexpensive way to customize your knife. You can use a variety of different materials to make them, and there are plenty of plans online to help you get started.
This video is aimed at beginner knife-makers, but it also shows how to make handles for a range of different types of knives. It breaks everything down into logical steps, with lots of photos to explain things clearly.
You can use a coping saw, scroll saw or band saw to cut out and shape the scales. It’s a good idea to cut about 1/16′′ outside the two tracings, so there is a bit of extra material around the scales for shaping.
Drilling
Drilling is the process of creating a hole in a solid material using a drill bit. It is a safe and effective way to make holes, however, it can cause blowouts, if not managed properly.
During the drilling process, a safety guard should be used to prevent splintering and blowouts. A backer board should also be used to protect the blade from being drilled and damaged by the drill bit.
Once the holes are drilled and the rough shaping is complete, you are ready to glue up and pin/bolt your scales. You can use any type of bonding agent but I prefer Super Glue(r).
Next, you will need to sand and shape the front section of the handle to match the rear portion. This can be done by hand or with a spindle sander. You will want to work at 100-grit first, then progressively increase the grit until your hand can hold the handle comfortably without pain or discomfort.
Sanding
Unlike dry sanding, where a piece of sandpaper is used without water, wet sanding uses a liquid to lubricate the paper and the material being sanded. This is done to make the sanding process more aggressive, as well as to remove surface imperfections and prepare the workpiece for the application of a finish.
In most cases, wet sanding is faster and more efficient than dry sanding because the abrasive can be applied more quickly. It is also useful for removing scratches that are too large to be removed with dry sanding.
If you are sanding wood, start with a coarse grit and gradually increase to finer grits. For example, if you are working with 80-grit paper, sand it to 100-grit and then 120-grit.
Finishing
The finishing process used to make scales for a knife can range from simple sanding and polishing to more intricate methods like heat treatment. Regardless of the method chosen, the end result is always the same: a one-of-a-kind handle that complements a high-carbon steel blade.
Wood types typically used for knife scales include rosewood, cocobolo, olive, and walnut. Each material has its own unique qualities and is best suited for particular applications.
Before you can assemble the scales to a handle, you’ll need to drill holes for the small machine screws that will hold them in place. First, use a finish nail or 1/16″-diameter drill bit to mark the centerpoints of each screw hole. Next, drill the screw shank pilot holes with a 3/32″ twist bit.
